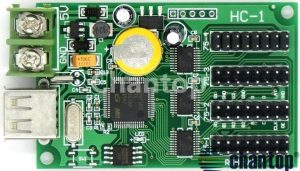
These HC-1 LED matrix controller cards are for use with LED panels using the HUB-75 signal / pin configuration.
The content is loaded via a USB flash drive which is programmed via some Windows software.
Plug your panel into the socket labelled 75-1 and connect 5V power to the card via the screw terminals next to the USB socket.
You will also need to power the LED panels from the 5V power supply. The HUB-75 connector is only for data, not power.
The 16 pin headers on the HC-1 card are not polarised so be careful to put the cable around the right way.
Pin 1 (with the stripe on the cable) should go the the left side of the board (closest to USB & power connectors).
The Windows software is typical of Chinese suppliers but usable once you learn its quirks.
You’ll need to unpack the U-Disk zip file first then run the XY_DUK1632.exe file. A shortcut will be placed on your desktop the first time you close the program.
Some operations in the software require a password – use led188 or 168 if prompted.
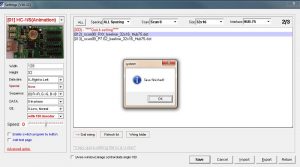
First, go into [Control] > Settings to configure the panel type.
Click Modify and enter the password (168 worked for me) if prompted. This will allow the settings to be changed.
Set the top line to [All Spacing] [Scan 8] [32×16] [HUB-75] and select mode (012) in the box below.
I left most of the options in the left panel at their defaults which worked fine for the P10 panels I had.
The main one to change is the Width and Height which need to be set to the matrix size you want.
Click Save, OK and Return to save your settings and close that screen.
In the tree structure in the left pane, you’ll see Page 1 > Main Window with some items listed.
You can select the unwanted items and click the Delete button at the top to remove them.
To add some simple scrolling text, click Add Rich Text and use the text editor down the bottom to enter the text you want.
You can customise it with different fonts, colours, backgrounds, offsets, etc.
The Text Attribute options near the bottom left of screen lets you set the scroll direction and speed.
You can use the Preview button at the top to see what your animation will look like.
Once you’re happy with the content, upload it to the USB drive using the U-disk REC button, following the prompts.
Don’t forget to save the content before exiting the program if you want to keep it for next time.
Plug the USB drive into the HC-1 card. It will first display “loading”, then “ok”. The animation will run when the stick is removed.
One really annoying thing that happens is that the U-Disk software messes with the Windows fonts.
To fix that, open Control Panel > Fonts > Adjust ClearType text and reactivate it. Do that after you close the program.
I’ve only scratched the surface of what you can do, but this will get you started at least.
There’s probably some steps that I’ve missed here, but I’ll edit this page when I have a LED panel and controller handy.

